Drawing 3D shapes
Topic Notes
- How to draw 3D shapes by hand
- That the “net” of a 3D shape is what it looks like when it is unfolded to show all faces flat in 2D
- How to draw a net for prisms, pyramids, and curved surface shapes
- How to draw 2D perspectives of 3D shapes (top view, side view, front view)
- How to find the cross section of a 3D shape
Notes:
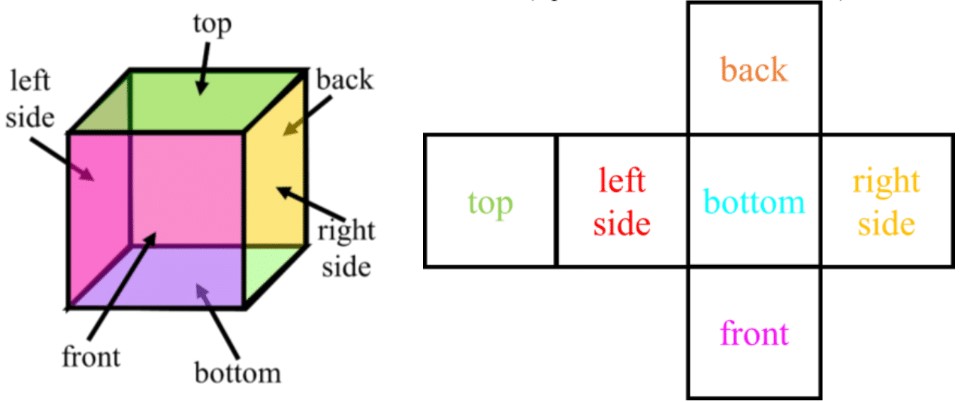
- A net is the 2D pattern that shows all the faces of a 3D shape as if it is unfolded
- Think about what happens when a 3D shape is flattened
- When drawing the net of 3D shapes, start with drawing the base as the 2D shape in your net, then continue adding faces that are connected to each other at different edges as 2D shapes in your net
- To draw the net of a prism:
- Recall that for a prism:
- the number of faces (f) is two more than the number of sides in the base (b);
- all the faces (besides the pair of bases) are rectangles
- Ex. the number of faces in a cube is 6 (square base, therefore: )
- To draw the net of a pyramid:
- Recall that for a pyramid:
- the number of faces (f) is one more than the number of sides in the base (b);
- all the faces (besides the single base at the bottom) are triangles
- Ex. the number of faces in a rectangular pyramid is 5 (rectangle base: )

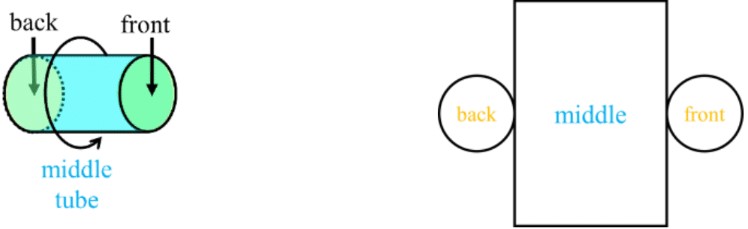
- To draw the net of a cylinder :
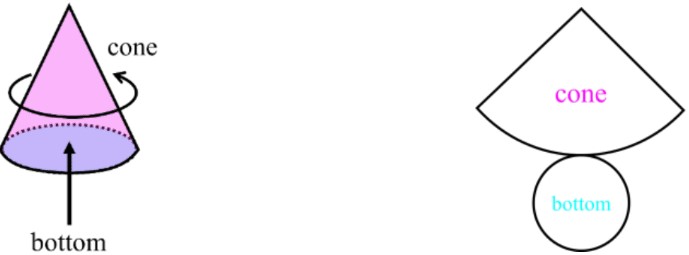
- To draw the net of a cone:
- For 2D perspectives of 3D shapes, draw the 2D faces that only can be seen when viewing the 3D shape from the: top view , side view, or front view.

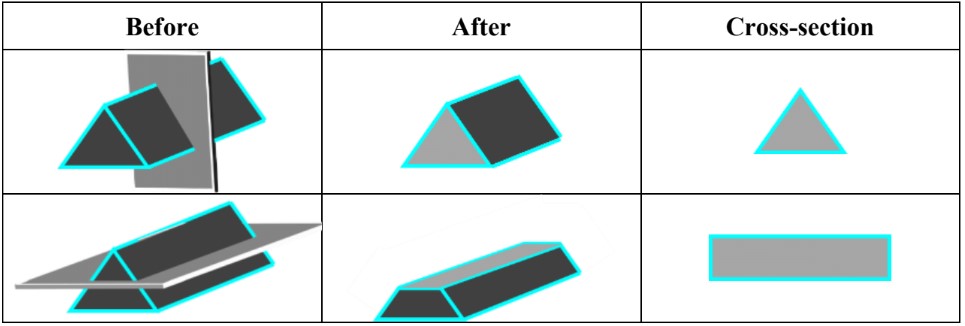
- The cross section of a 3D shapes is obtained when a flat plane intersects a 3D shape (cuts straight through it).
Introduction to Drawing 3D Shapes
Drawing 3D shapes is a fundamental skill in geometry and visual arts. Our introduction video serves as a crucial starting point, offering a comprehensive overview of this fascinating topic. As you embark on this journey, you'll discover the intricacies of creating three-dimensional objects on a two-dimensional surface. We'll explore three main areas: drawing 3D shapes by hand, understanding 3D nets, and examining different perspectives of 3D shapes. Learning to draw 3D shapes by hand enhances spatial awareness and improves visualization skills. Understanding 3D nets helps in grasping how flat shapes can be folded into three-dimensional objects. Exploring various perspectives of 3D shapes develops a deeper comprehension of geometry and spatial relationships. Whether you're an aspiring artist, architect, or simply curious about geometry, mastering the art of creating three-dimensional objects will open up new dimensions in your understanding of the world around you.
Drawing 3D Shapes by Hand
Drawing 3D shapes by hand is a valuable skill that enhances spatial awareness and artistic abilities. This process is particularly important when creating representations of rectangular prisms and triangular prisms. To successfully draw these shapes, it's crucial to first visualize them in your mind and understand their properties.
Let's begin with the rectangular prism, a six-faced shape with all right angles. To draw this shape:
- Start by drawing a rectangle on your paper. This will be the front face of your prism.
- From the top two corners of this rectangle, draw two lines extending backwards at a 45-degree angle. These lines create the illusion of depth.
- Connect these lines with horizontal and vertical lines to complete the back face of the prism.
- Use dotted lines to represent the hidden edges, which are the lines that would not be visible if the prism were solid.
The use of dotted lines for hidden edges is a key technique in creating realistic 3D drawings. It helps the viewer understand the full structure of the shape while maintaining the illusion of solidity.
Now, let's move on to the triangular prism, which has two triangular faces and three rectangular faces. The process for drawing this shape is similar:
- Begin by drawing a triangle. This will be one of the end faces of your prism.
- From each corner of the triangle, draw lines extending backwards at a 45-degree angle.
- Connect these lines to form the rectangular sides of the prism.
- Draw the back triangular face, using dotted lines for any edges that would be hidden behind the solid shape.
When drawing these shapes, it's important to pay attention to perspective and proportion. The lines extending backwards should be parallel to each other and at consistent angles to create a realistic 3D effect. Practice drawing these shapes from different angles to improve your understanding of how they appear in various orientations.
To enhance the illusion of depth in your drawings, consider adding shading. Light typically comes from above, so the top faces of your shapes should be lighter, while the sides and bottom should be progressively darker. This technique helps to make your 3D shapes appear more solid and realistic.
Another helpful tip is to use a light pencil for your initial sketch. This allows you to easily erase and adjust your lines as you refine the shape. Once you're satisfied with the basic structure, you can go over the visible edges with a darker pencil or pen to make them stand out.
Remember that visualization is key when drawing 3D shapes. Before putting pencil to paper, take a moment to imagine the shape from different angles. Consider how the faces connect and which edges would be visible from your chosen perspective. This mental preparation will greatly improve your ability to accurately represent the shape on paper.
As you practice drawing rectangular and triangular prisms, you'll develop a better understanding of how 3D shapes work. This skill is not only useful for artistic purposes but also has practical applications in fields such as architecture, engineering, and product design. The ability to quickly sketch 3D shapes can be invaluable when communicating ideas or planning projects.
To further improve your skills, try combining multiple prisms in a single drawing. This will help you understand how 3D shapes interact and overlap. You can also experiment with more complex shapes, such as cylinders or spheres, applying the same principles of perspective and hidden edges.
In conclusion, drawing 3D shapes by hand is a skill that combines visualization, understanding of geometric properties, and artistic techniques. By following the steps outlined for rectangular and triangular prisms, and practicing regularly, you can develop the ability to create convincing 3D drawings. Remember to use dotted lines for hidden edges, pay attention to perspective, and consider adding shading to enhance the illusion of depth. With practice, you'll find that drawing 3D shapes becomes more intuitive and enjoyable, opening up new possibilities for your artistic and professional endeavors.
Understanding 3D Nets
A 3D net is a two-dimensional representation of a three-dimensional shape that, when folded along specific lines, creates the original 3D object. Understanding 3D nets is crucial in geometry and spatial reasoning, as it helps visualize how flat surfaces come together to form three-dimensional structures. This concept is particularly important in fields such as engineering, architecture, and packaging design.
The importance of 3D nets lies in their ability to bridge the gap between 2D and 3D thinking. They allow us to see all the faces of a 3D shape simultaneously in a flat layout, which is especially useful for understanding the relationships between different surfaces and edges. This skill is fundamental in developing spatial awareness and problem-solving abilities in mathematics and beyond.
Creating nets for different 3D shapes involves careful consideration of how each face connects to the others. Let's explore how to create nets for some common 3D shapes:
Cube Net:
1. Start with a square, which will be the base of the cube.
2. Draw four squares attached to each side of the base square.
3. Add one more square to any of the four side squares to complete the net.
4. Ensure all squares are the same size for a perfect cube.
Rectangular Prism Net:
1. Begin with a rectangle for the base.
2. Draw two rectangles of the same size as the base, attached to the longer sides.
3. Add two rectangles to the shorter sides, matching the height of the prism.
4. Complete the net with one more rectangle attached to any of the side rectangles.
Pyramid Net:
1. Start with the shape of the base (e.g., a square for a square-based pyramid).
2. Draw triangles around each side of the base, ensuring they all meet at a single point.
3. The triangles should be isosceles, with two equal sides that will form the edges of the pyramid.
When drawing these nets, it's crucial to understand how the faces of the 3D shape connect. Each edge in the 3D shape should be represented by a fold line in the net. The faces should be arranged in a way that allows them to fold together without overlapping or leaving gaps. This understanding helps in visualizing how the flat net will transform into a three-dimensional object.
It's important to note that there can be multiple correct representations of nets for the same shape. For example, a cube can have several different net configurations:
1. The classic "cross" shape with four squares in a line and two squares branching off.
2. A "T" shape with three squares in a line and three forming the top of the T.
3. An "L" shape with four squares in one direction and two in the perpendicular direction.
These different representations illustrate that as long as the net contains all the necessary faces and can be folded to form the 3D shape without overlaps, it is a valid net. This concept of multiple representations enhances spatial reasoning skills and encourages creative thinking in geometry.
Practicing the creation of 3D nets can significantly improve one's ability to visualize and understand three-dimensional objects. It's a valuable skill that extends beyond mathematics into various practical applications. For instance, in packaging design, understanding nets is essential for creating efficient and attractive product containers. In architecture and engineering, the ability to mentally unfold and reconstruct 3D shapes is crucial for designing complex structures and solving spatial problems.
As you explore 3D nets, challenge yourself to create nets for more complex shapes like cylinders, cones, or even irregular polyhedra. Remember that the key to mastering this skill is practice and experimentation. Try folding your drawn nets to verify their accuracy and explore how slight changes in the net layout can affect the final 3D shape. This hands-on approach will deepen your understanding of the relationship between 2D representations and 3D objects, enhancing your overall spatial reasoning abilities.
2D Perspectives of 3D Shapes
Understanding 2D perspectives of 3D shapes is crucial in various fields, particularly in engineering and design. These perspectives, namely the top view, side view, and front view, provide essential information about an object's structure and dimensions. Let's explore these concepts using a compound 3D shape made of cubes as an example.
The top view, also known as the plan view, shows how an object appears when viewed directly from above. It provides information about the object's length and width. For our compound cube shape, imagine looking down on it from a bird's-eye perspective. You would see the outlines of the cubes forming the uppermost layer, with any lower layers hidden from view.
The side view, or elevation view, depicts the object as seen from one side. It reveals the height and depth of the shape. In our cube example, the side view would show the vertical arrangement of the cubes, including any variations in height or depth across the structure.
The front view, another type of elevation view, represents how the object looks when viewed straight on from the front. This perspective provides information about the width and height of the shape. For our compound cube structure, the front view would display the arrangement of cubes as seen from the front, showing any variations in the facade.
To draw these views effectively, follow these step-by-step instructions:
1. Top View: - Start by identifying the outermost boundaries of the shape from above. - Draw the outlines of the visible cubes, focusing only on what can be seen from directly above. - Ignore any lower layers or hidden cubes. - Use dashed lines to indicate edges that are not visible but help define the shape.
2. Side View: - Choose one side of the object to represent. - Draw the outline of the shape as seen from that side. - Include all visible edges and surfaces. - Use solid lines for visible edges and dashed lines for hidden edges that are important for understanding the structure.
3. Front View: - Position yourself directly in front of the object. - Draw the outline of the shape as seen from this perspective. - Include all visible edges and surfaces from the front. - Again, use solid lines for visible edges and dashed lines for hidden but important edges.
When drawing these views, it's crucial to maintain consistent scale and alignment across all perspectives. This ensures that the dimensions and proportions are accurately represented in each view.
Understanding and being able to create these 2D perspectives of 3D shapes is invaluable in engineering and design. In engineering, these views are essential for creating technical drawings and blueprints. They allow engineers to communicate complex 3D structures clearly and precisely on 2D mediums like paper or computer screens. This skill is fundamental in fields such as architecture, mechanical engineering, and product design.
In design, these perspectives help in visualizing and planning 3D objects. Designers use these views to ensure that their creations are not only aesthetically pleasing but also functionally sound from all angles. This is particularly important in industrial design, where products need to be both visually appealing and practical.
Moreover, the ability to interpret and create these views enhances spatial reasoning skills. It helps in developing a better understanding of how 3D objects relate to space and how they can be represented in 2D formats. This skill is valuable not only in professional settings but also in everyday problem-solving scenarios that involve spatial relationships.
In conclusion, mastering the art of drawing and interpreting top, side, and front views of 3D shapes is a fundamental skill in engineering and design. It bridges the gap between 3D reality and 2D representation, enabling clear communication of complex structures. By practicing with simple shapes like our compound cube example and gradually moving to more complex objects, one can develop this essential skill, opening doors to a wide range of applications in various professional fields.
Cross Sections of 3D Shapes
A cross-section is a two-dimensional representation of a three-dimensional object, obtained by intersecting the object with a plane. This concept is crucial in understanding the internal structure and properties of 3D shapes. Cross-sections provide valuable insights into the geometry and composition of objects, making them essential in fields such as mathematics, engineering, and architecture.
The significance of cross-sections lies in their ability to reveal hidden features and relationships within 3D shapes. By examining different cross-sections, we can better comprehend the overall form and structure of complex objects. This understanding is particularly important in various applications, including medical imaging, geological studies, and computer-aided design.
To obtain a cross-section, an intersecting plane is used to "slice" through a 3D shape. The resulting shape on the plane represents the cross-section. The orientation and position of the intersecting plane greatly influence the shape of the cross-section. By varying the angle and location of the plane, we can generate different cross-sections that provide unique perspectives on the object's internal structure.
Let's explore some examples of cross-sections for different 3D shapes:
1. Prisms: A prism is a 3D shape with two identical ends (bases) connected by flat sides. The cross-section of a prism depends on the angle of the intersecting plane:
- When the plane is parallel to the base, the cross-section is identical to the base shape (e.g., a triangle for a triangular prism, a rectangle for a rectangular prism).
- When the plane is perpendicular to the base, the cross-section is a rectangle (assuming the prism has a uniform cross-section along its length).
- When the plane intersects at an angle, the cross-section is typically a polygon with a shape that varies based on the angle.
2. Cylinders: A cylinder is a 3D shape with circular bases connected by a curved surface. The cross-sections of a cylinder can be:
- A circle, when the intersecting plane is parallel to the base.
- A rectangle, when the plane is perpendicular to the base and passes through the center axis.
- An ellipse, when the plane intersects the cylinder at an angle other than 90 degrees.
3. Cones: A cone is a 3D shape with a circular base that tapers to a point (apex). The cross-sections of a cone can be quite diverse:
- A circle, when the intersecting plane is parallel to the base.
- A triangle, when the plane passes through the apex and intersects the base.
- An ellipse, when the plane intersects the cone at an angle that doesn't pass through the apex.
- A parabola, when the plane is parallel to a line on the cone's surface.
- A hyperbola, when the plane intersects both nappes of a double cone.
The orientation of the intersecting plane plays a crucial role in determining the shape of the resulting cross-section. For example, in a cylinder:
- A horizontal plane (parallel to the base) always produces a circular cross-section.
- A vertical plane (perpendicular to the base) passing through the center axis creates a rectangular cross-section.
- An angled plane produces an elliptical cross-section, with the eccentricity of the ellipse depending on the angle of intersection.
Visual examples are particularly helpful in illustrating these concepts. Imagine slicing a loaf of bread at different angles: a straight cut perpendicular to the loaf's length gives a rectangular slice, while an angled cut produces an oval-shaped slice. This analogy helps visualize how the orientation of the intersecting plane affects the resulting cross-section shape.
Understanding cross-sections is not only important in mathematics but also has practical applications in various fields.
Applications and Importance of 3D Shape Drawing
Drawing 3D shapes is a fundamental skill with wide-ranging practical applications across various fields, particularly in architecture, engineering, and computer graphics. In architecture, the ability to visualize and represent three-dimensional structures is crucial for designing buildings, urban spaces, and landscapes. Architects use 3D drawings to communicate their ideas, plan layouts, and showcase designs to clients. Similarly, in engineering, 3D shape drawing is essential for product design, mechanical engineering, and structural analysis. Engineers rely on these skills to create detailed blueprints, prototype designs, and visualize complex mechanical systems.
In the realm of computer graphics, 3D shape drawing forms the foundation for creating immersive digital environments, animated characters, and special effects in films and video games. Professionals in this field use advanced software to model, texture, and render 3D objects, bringing imaginary worlds to life. The understanding of 3D shapes and their representations significantly contributes to the development of spatial reasoning skills. These skills enable individuals to mentally manipulate objects, understand spatial relationships, and solve complex problems in three-dimensional space.
Real-world scenarios where spatial reasoning and 3D drawing skills are applied include urban planning, where professionals must consider the impact of new structures on existing cityscapes. In manufacturing, these skills are crucial for designing efficient production lines and optimizing factory layouts. Medical professionals use 3D visualization techniques for surgical planning and creating prosthetics. Even in fields like interior design and fashion, the ability to conceptualize and represent 3D forms is invaluable for creating functional and aesthetically pleasing designs.
Practicing 3D drawing techniques is essential for improving overall understanding of geometry and spatial relationships. Regular practice enhances one's ability to perceive depth, understand proportions, and visualize complex forms. This not only benefits professionals in technical fields but also improves problem-solving skills and creativity in everyday life. As technology continues to advance, the importance of these skills in virtual and augmented reality applications is becoming increasingly evident. By honing 3D drawing skills, individuals can better navigate and contribute to our increasingly three-dimensional digital world, opening up new opportunities in emerging technologies and industries.
Conclusion
In this article, we've explored essential aspects of 3D geometry, starting with the fundamental skill of drawing 3D shapes by hand. We delved into the concept of 3D nets, which are crucial for understanding how three-dimensional objects can be unfolded into two-dimensional patterns. The exploration of 2D perspectives provided insights into how 3D objects are represented in flat drawings, enhancing spatial reasoning skills. We also examined cross-sections, offering a unique view into the internal structure of 3D shapes. The introduction video served as a vital visual foundation, illustrating these concepts in action and setting the stage for deeper understanding. By mastering these key points, students can develop a robust grasp of 3D geometry, improving their ability to visualize and manipulate complex shapes in both academic and real-world contexts. This comprehensive approach to 3D geometry equips learners with valuable skills applicable across various fields, from architecture to engineering and beyond.
Introduction to Drawing 3D Shapes: How to Draw 3D Shapes by Hand
In this guide, we will learn how to draw 3D shapes by hand. We will cover the basics of drawing rectangular prisms, triangular prisms, and pyramids. By following these steps, you will be able to create accurate and visually appealing 3D shapes.
Step 1: Understanding the Basics
Before we start drawing, it's important to understand the basic concepts of 3D shapes. A 3D shape has three dimensions: length, width, and height. When drawing these shapes, we need to visualize them in our minds and understand how they look from different perspectives.
Step 2: Drawing a Rectangular Prism
Let's start with a rectangular prism. A rectangular prism is a 3D shape with six rectangular faces. Here's how to draw it:
- Begin by drawing a rectangle. This will be the front face of the prism.
- Next, draw a slanted line from each corner of the rectangle. These lines should be parallel and of equal length.
- Connect the ends of the slanted lines to form the back face of the prism.
- Draw lines to connect the corresponding corners of the front and back faces. These lines should be parallel to the edges of the rectangles.
- To add depth, draw dotted lines to represent the edges that are not visible from the front view.
Step 3: Drawing a Triangular Prism
Next, let's draw a triangular prism. A triangular prism has two triangular faces and three rectangular faces. Follow these steps:
- Start by drawing a triangle. This will be the front face of the prism.
- Draw a slanted line from each corner of the triangle. These lines should be parallel and of equal length.
- Connect the ends of the slanted lines to form the back face of the prism.
- Draw lines to connect the corresponding corners of the front and back faces. These lines should be parallel to the edges of the triangles.
- To add depth, draw dotted lines to represent the edges that are not visible from the front view.
Step 4: Drawing a Rectangular Pyramid
Now, let's draw a rectangular pyramid. A rectangular pyramid has a rectangular base and four triangular faces that meet at a common vertex. Here's how to draw it:
- Begin by drawing a parallelogram. This will be the base of the pyramid.
- Find the center of the base and draw a point above it. This will be the common vertex where all the triangular faces meet.
- Draw lines from each corner of the base to the common vertex.
- To add depth, draw dotted lines to represent the edges that are not visible from the front view.
Step 5: Drawing a Triangular Pyramid
Finally, let's draw a triangular pyramid. A triangular pyramid has a triangular base and three triangular faces that meet at a common vertex. Follow these steps:
- Start by drawing a triangle. This will be the base of the pyramid.
- Find the center of the base and draw a point above it. This will be the common vertex where all the triangular faces meet.
- Draw lines from each corner of the base to the common vertex.
- To add depth, draw dotted lines to represent the edges that are not visible from the front view.
Conclusion
By following these steps, you can draw various 3D shapes by hand. Remember to visualize the shapes in your mind and use parallel lines to create the 3D effect. Practice drawing different shapes to improve your skills and create more complex 3D drawings.
FAQs
-
What are the basic steps to draw a 3D rectangular prism?
To draw a 3D rectangular prism:
- Start with a rectangle for the front face.
- Draw two 45-degree lines from the top corners extending backwards.
- Connect these lines to form the back face.
- Use dotted lines for hidden edges.
-
How do 3D nets help in understanding three-dimensional shapes?
3D nets are 2D representations of 3D shapes that can be folded to create the object. They help visualize all faces of a 3D shape simultaneously, improving spatial awareness and understanding of how flat surfaces connect to form 3D structures. This is particularly useful in fields like packaging design and engineering.
-
What are the main 2D perspectives used in technical drawings of 3D objects?
The main 2D perspectives are:
- Top view (plan view): Shows length and width from above.
- Side view (elevation): Depicts height and depth from the side.
- Front view: Displays width and height from the front.
These views provide comprehensive information about an object's dimensions and structure.
-
How do cross-sections help in understanding 3D shapes?
Cross-sections reveal the internal structure of 3D shapes by showing the 2D shape created when a plane intersects the object. They provide insights into the object's composition and geometry, which is crucial in fields like medical imaging, geology, and engineering. Different cross-sections can be obtained by varying the angle and position of the intersecting plane.
-
Why is learning to draw 3D shapes important in various professions?
Drawing 3D shapes is crucial in many fields:
- Architecture: For designing buildings and urban spaces.
- Engineering: In product design and structural analysis.
- Computer Graphics: For creating digital environments and animations.
- Medicine: In surgical planning and prosthetics design.
It enhances spatial reasoning, problem-solving skills, and the ability to visualize complex structures, which are valuable in both professional and everyday contexts.
Prerequisite Topics
When it comes to mastering the art of drawing 3D shapes, a solid foundation in certain mathematical concepts is crucial. One of the most important prerequisite topics is understanding how to use sine ratio to calculate angles and sides. This fundamental trigonometric principle plays a pivotal role in accurately representing three-dimensional objects on a two-dimensional surface.
The sine ratio, often expressed as Sin = o / h (opposite over hypotenuse), is a powerful tool in determining the relationships between angles and sides in right-angled triangles. This concept is particularly relevant to drawing 3D shapes because it allows artists and designers to precisely calculate the angles and proportions needed to create realistic depth and perspective in their drawings.
When drawing 3D shapes, you'll often encounter situations where you need to represent objects at various angles and orientations. Understanding the sine ratio enables you to accurately determine the length of sides and the measure of angles in these complex configurations. This knowledge is especially valuable when dealing with more intricate shapes or when aiming for a high level of precision in technical or architectural drawings.
Moreover, the ability to work with right angles and trigonometric ratios is essential for creating believable 3D illusions on paper. It helps in establishing correct vanishing points, determining foreshortening effects, and maintaining proper proportions across different planes of the object being drawn.
Understanding this prerequisite topic also enhances your spatial reasoning skills, which are crucial for visualizing and accurately representing three-dimensional objects in a two-dimensional medium. It allows you to mentally manipulate shapes and understand how they would appear from different viewpoints, a skill that is indispensable in 3D drawing.
Furthermore, this knowledge extends beyond just drawing. It forms the basis for more advanced concepts in 3D modeling, computer-aided design (CAD), and even animation. As you progress in your journey of mastering 3D shapes, you'll find that this foundational understanding of trigonometric ratios becomes increasingly valuable, enabling you to tackle more complex projects with confidence.
In conclusion, while it might seem abstract at first, the ability to use sine ratio to calculate angles and sides is an indispensable skill for anyone serious about drawing 3D shapes. It provides the mathematical backbone needed to create accurate, realistic, and visually compelling three-dimensional representations. By mastering this prerequisite topic, you'll be well-equipped to bring your 3D drawings to life with precision and artistry.