How to read time (digital and analogue clocks)
Topic Notes
In this lesson, we will learn:
- A digital clock can be read left to right as it shows [hours : minutes : seconds] and [AM/PM] in 12-hour clock time.
- An analog (analogue) clock is a circle with 12 big divisions for the hours with 5 smaller divisions each (total of 60 divisions) to represent the minutes and the hours for 12-hour clock time.
Notes:
- To read a digital clock:

- It shows all the digits for hours, minutes, and sometimes seconds
- Each different unit of time is separated by a colon
- It can also show whether it is AM or PM for 12-hour clock time
- When we talk about AM and PM , it actually means before midday (ante meridiem) and after midday (post meridiem)
- The previous day ends and the next day starts at midnight (12:00 AM)
- The middle of the day is at noon (12:00 PM)
- There are four different parts of the day, they can be generally defined:
- Morning: starts at sunrise, ends before noon (6:00 AM to 11:59 AM)
- Afternoon: starts after noon, ends at sunset (12:01 PM to 5:00 PM)
- Evening: starts at sunset, ends when it is dark (5:01 PM to 8:00 PM)
- Night: starts when it is dark, ends before sunrise (8:01 PM to 5:59 AM)
- To read an analog clock (or spelled as analogue clock):
- AM/PM is not specified. There are three hands on an analog clock to represent:
- Hours: the shorter, thicker hand
- Minutes: the longer, thicker hand
- Seconds: the longest and thinnest hand
- The analog clock is a circle with 12 equal and labelled divisions around it. These numbers (1-12) refer to the hours.
- Each of the 12 divisions is further divided into 5 equal (unlabelled) smaller parts (12×5=60 total divisions; there are 60 minutes in 1 hour). You can find out the number of minutes by counting by 5s if they land on any of the numbers (1-12).
- The number of seconds can be read in the same way as minutes. The only difference is that this hand is moving the fastest, because there are 60 seconds in 1 minute.
- The hands of the clock move in the clockwise direction to move forward (from top right bottom left back to top). The opposite/reverse direction (counter clockwise) is going backwards.
Introduction to Reading Time
Welcome to our lesson on reading time! Learning to tell time is an essential skill that helps you manage your day and stay organized. Whether you're looking at an analog clock with hands or a digital clock with numbers, understanding how to read time is crucial. Our introduction video will guide you through the basics of reading both types of clocks. This video is designed to make learning fun and easy, using colorful visuals and simple explanations. You'll discover how the hands on an analog clock work together to show hours and minutes, and how to interpret the numbers on a digital display. By mastering this skill, you'll be able to keep track of your schedule, arrive on time for activities, and even plan your day more effectively. So, let's get started on this exciting journey to become time-reading experts!
Understanding Digital Clocks
Welcome to the world of digital clocks! Let's explore these modern timekeepers together and learn how to read them like a pro. Digital clocks are everywhere - on your phone, computer, microwave, and even as standalone devices. They're designed to make telling time quick and easy, but if you're new to them, don't worry! We'll break it down step by step.
First, let's look at the main components of a digital clock display:
- Hours: This is typically the first number you see, usually ranging from 1 to 12 or 0 to 23.
- Minutes: These come after the hours and range from 00 to 59.
- Seconds: Not all digital clocks show seconds, but when they do, they also range from 00 to 59.
- AM/PM indicator: This tells you whether it's morning (AM) or afternoon/evening (PM).
Now, let's walk through how to read a digital clock:
- Start with the hours. If you see a number like 3, 7, or 11, that's straightforward. But what if you see 15 or 23? Don't panic! Some digital clocks use a 24-hour format. In this case, subtract 12 from any number 13 or higher to get the PM time. For example, 15:00 is 3:00 PM, and 23:00 is 11:00 PM.
- Next, look at the minutes. These are usually separated from the hours by a colon (:). If you see 3:45, that means 45 minutes past 3 o'clock.
- If seconds are displayed, they'll come after another colon. So, 3:45:30 means 30 seconds past 3:45.
- Finally, check for the AM/PM indicator. AM stands for "ante meridiem" (before midday), while PM means "post meridiem" (after midday). If it's AM, the time is between midnight and 11:59 in the morning. PM covers noon to 11:59 at night.
Let's practice with some examples:
- 7:30 AM - This is half past seven in the morning.
- 2:15 PM - This is quarter past two in the afternoon.
- 11:59 PM - This is one minute before midnight.
- 00:00 or 12:00 AM - This is midnight, the start of a new day.
- 14:45 - In 24-hour format, this is 2:45 PM.
Remember, digital clocks are designed to make time-reading simple. The numbers directly tell you the hour and minute, unlike analog clocks where you need to interpret the position of hands. With a little practice, you'll be reading digital time effortlessly!
Here's a fun tip: Many digital devices allow you to switch between 12-hour and 24-hour formats. Try both and see which one you prefer. Some people find the 24-hour format more precise, especially when setting alarms or scheduling events.
As you go about your day, take a moment to look at the digital clocks around you. Practice reading them out loud: "It's 10:23 AM" or "It's 18:05" (6:05 PM in 24-hour time). Soon, it'll become second nature, and you'll be a digital clock reading expert!
Parts of the Day
Let's explore the four main parts of the day: morning, afternoon, evening, and night. Each part has its own special time and activities that make it unique!
Morning is the start of our day. It usually begins when the sun rises, around 6:00 AM. This is when we wake up, get out of bed, and start our daily routines. Many people eat breakfast, brush their teeth, and get ready for school or work during this time. The air feels fresh, and birds might be chirping outside your window. Morning typically lasts until about noon (12:00 PM).
After morning comes afternoon. This part of the day starts at noon and continues until about 5:00 PM or 6:00 PM. Afternoon is often the busiest time of day. Students are in school, adults are at work, and the sun is high in the sky. Lunchtime usually happens in the early afternoon. Later in the afternoon, you might have after-school activities, play with friends, or do homework.
As the day winds down, we enter the evening. Evening begins when the afternoon ends, usually around 5:00 PM or 6:00 PM, and lasts until bedtime. This is when many families have dinner together. The sun starts to set, painting the sky with beautiful colors. In the evening, you might watch TV, read a book, or spend time with your family. Some people use this time to relax after a busy day.
Finally, we have night. Night starts when it gets dark outside, typically around 8:00 PM or 9:00 PM, depending on the season. This is when most people go to bed and sleep. The stars come out, and nocturnal animals become active. While most of us are sleeping, some people work night shifts at hospitals, factories, or other places that need to be open 24 hours a day.
Understanding the parts of the day helps us organize our time and activities. For example, we know that morning is for waking up and starting our day, while night is for sleeping and resting. Each part of the day has its own special feeling and purpose, making our daily experiences rich and varied. Remember, the exact times for each part of the day can change depending on the season and where you live in the world, but the general pattern stays the same. By recognizing these different parts of the day, we can better appreciate how time passes and how our daily routines fit into the natural rhythm of the world around us.
Introduction to Analog Clocks
Analog clocks are timeless tools that have been helping people keep track of time for centuries. Unlike digital clocks that display numbers, analog clocks use a circular face and moving hands to show the time. Let's explore the fascinating world of analog clocks together!
The most noticeable part of an analog clock is its clock face. Imagine a big circle with numbers arranged around its edge. These numbers typically go from 1 to 12, representing the hours in a day. The clock face is like a map that helps us read the time.
Now, let's talk about the clock's hands. An analog clock usually has three hands: the hour hand, the minute hand, and the second hand. Each of these hands has a special job in telling time.
The hour hand is the shortest and thickest of the three. It moves slowly around the clock face, pointing to the current hour. As time passes, you'll see it gradually move from one number to the next.
The minute hand is longer and thinner than the hour hand. It moves faster, completing a full circle around the clock face in 60 minutes. When the minute hand points to 12, it means a new hour has begun.
The second hand is usually the longest and thinnest. It moves the fastest, ticking along steadily, and completes a full circle in just one minute. Some clocks don't have a second hand, but when present, it helps us measure time more precisely.
All these hands move in a special direction called "clockwise." Imagine drawing a circle and moving your finger around it, always going to the right. That's clockwise movement! The hands of an analog clock always move in this direction, from 12 to 1, then 2, 3, and so on, until they complete the circle.
To read an analog clock, start by looking at where the hour hand is pointing. This gives you a general idea of the hour. Then, check the minute hand to get a more precise time. The second hand, if present, shows you the exact seconds.
Learning to read an analog clock might take some practice, but don't worry! With time and patience, you'll become an expert. Try to imagine the clock face as a pizza, with each slice representing five minutes. This visual can help you understand how the minutes are divided.
Analog clocks come in many shapes and sizes. Some have Roman numerals (I, II, III, IV) instead of regular numbers. Others might have beautiful designs or even moving figures that appear when the hour changes. No matter their style, all analog clocks work on the same principle of rotating hands.
Remember, every time you look at an analog clock, you're seeing a little piece of history. These clocks have been telling time for generations, and now you're part of that tradition. Keep practicing, and soon you'll be reading analog clocks as easily as you count your fingers!
Analog clocks are not just tools; they're also works of art. Many people collect them or use them as decorative pieces in their homes. Next time you see an analog clock, take a moment to appreciate its design and the clever way it shows the passage of time.
As you become more familiar with analog clocks, you'll start to notice them everywhere in classrooms, on buildings, and even in paintings and photographs. They're a universal symbol of time that connects people across different cultures and languages.
So, the next time someone asks you for the time, try reading it from an analog clock. With practice, you'll be able to tell the time quickly and accurately. Remember, every great clock reader started just where you are now. Keep at it, and you'll be a time-telling pro in no time!
Reading Hours on an Analog Clock
Learning to read the hour on an analog clock is an essential life skill that can seem challenging at first, but with practice, it becomes second nature. Let's break down the process into simple, easy-to-follow steps that will have you reading analog clocks like a pro in no time!
Step 1: Familiarize yourself with the clock face. An analog clock typically has 12 numbers arranged in a circle, with the 12 at the top, 3 on the right, 6 at the bottom, and 9 on the left. The clock has two main hands: a shorter hour hand and a longer minute hand.
Step 2: Focus on the hour hand. This is the shorter of the two hands and is the key to reading the hour. Remember, the hour hand moves slowly and continuously around the clock face.
Step 3: Identify where the hour hand is pointing. If it's pointing directly at a number, that's the current hour. For example, if the hour hand is pointing exactly at 3, it's 3 o'clock.
Step 4: Understand the significance of the hour hand's position between numbers. This is where many people get confused, but it's actually quite simple. When the hour hand is between two numbers, the hour is the lower number it has passed.
Let's look at some examples:
- If the hour hand is between 2 and 3, it's still 2 o'clock.
- If the hour hand is halfway between 4 and 5, it's 4 o'clock.
- Even if the hour hand is close to the next number but hasn't reached it yet, you still read the lower hour.
Step 5: Practice with different scenarios. Imagine the hour hand at various positions and determine the hour. For instance:
- The hour hand is just past 7: It's 7 o'clock.
- The hour hand is almost at 11 but not quite there: It's still 10 o'clock.
- The hour hand is exactly on 1: It's 1 o'clock.
Remember, the minute hand can help confirm your reading. When the hour changes, the minute hand will be at 12 (or 60 minutes). If the minute hand is not at 12, you know you're still in the previous hour.
Don't worry if it takes some time to get comfortable with reading analog clocks. Like any skill, it improves with practice. Try these exercises to build your confidence:
1. Look at analog clocks throughout your day and practice reading the hour.
2. Draw clock faces with different hour hand positions and quiz yourself.
3. Use online clock reading games or apps for interactive practice.
4. Ask friends or family to quiz you on different clock readings.
As you practice, you'll notice patterns and develop a natural intuition for reading the hour. Soon, you'll be able to glance at an analog clock and instantly know the time without even thinking about it!
Remember, everyone learns at their own pace. If you find yourself struggling, don't get discouraged. Take your time, and don't hesitate to ask for help or explanations if something isn't clear. With patience and persistence, you'll master the art of reading analog clocks in no time.
Reading an analog clock is more than just a practical skill; it's a connection to timekeeping traditions that have been around for centuries. As you become more proficient, you'll appreciate the elegance and simplicity of analog clocks, and you might even find yourself preferring them to digital displays!
So, keep practicing, stay positive, and before you know it, you'll be reading analog clocks with ease and confidence. Time is on your side!
Reading Minutes on an Analog Clock
Learning to read minutes on an analog clock is an essential skill that can seem challenging at first, but with practice, it becomes second nature. Let's explore how to master this ability step by step.
First, let's understand the basics of an analog clock face. The clock is divided into 12 sections, marked by numbers 1 through 12. The long hand on the clock is called the minute hand, and it's the key to reading minutes accurately.
To read minutes, we need to focus on where the minute hand is pointing. Each number on the clock represents 5 minutes. For example:
- When the minute hand points to 1, it's 5 minutes
- When it points to 2, it's 10 minutes
- When it points to 3, it's 15 minutes
- And so on...
Remember, the minute hand makes a complete rotation around the clock face in 60 minutes, which is one hour.
Now, let's introduce the concepts of 'past' and 'to' the hour. When the minute hand is on the right side of the clock (from 12 to 6), we say the minutes are 'past' the hour. When it's on the left side (from 6 to 12), we say the minutes are 'to' the next hour.
For example:
- 3:10 is read as "ten minutes past three"
- 2:20 is "twenty minutes past two"
- 4:45 can be read as "fifteen minutes to five" (because it's 15 minutes before 5:00)
Let's practice with more scenarios:
- When the minute hand is exactly on 3, it's quarter past the hour (15 minutes)
- When it's on 6, it's half past the hour (30 minutes)
- When it's on 9, it's quarter to the next hour (45 minutes)
For minutes between the numbers, you'll need to count by fives and then add the extra minutes. For instance, if the minute hand is between 4 and 5, it could be 22 minutes (4 x 5 = 20, plus 2 more).
Here's a helpful tip: the space between each number represents 1 minute. So, if the hand is just past a number, add 1 or 2 minutes to your count.
Let's try a few more examples:
- If the minute hand is halfway between 2 and 3, it's 12 minutes past the hour
- If it's just before 8, it's 38 or 39 minutes past the hour
- If it's a little after 10, it's about 52 minutes past (or 8 minutes to the next hour)
Remember, practice makes perfect! Don't get discouraged if it takes some time to get comfortable with reading minutes. Here are some exercises you can try:
- Set different times on an analog clock or watch and practice reading them
- Look at clocks throughout your day and challenge yourself to read the minutes quickly
- Draw clock faces and practice placing the minute hand for different times
As you become more familiar with reading minutes, you'll find that you can quickly glance at an analog clock and know the time without having to count. It's a skill that will serve you well throughout your life.
Keep in mind that analog clocks are still widely used in
Understanding Seconds on an Analog Clock
Reading seconds on an analog clock is an essential skill that adds precision to your time-telling abilities. The second hand on an analog clock is typically the thinnest and longest hand, constantly moving in a smooth, circular motion. Unlike the hour and minute hands, which move gradually, the second hand completes a full rotation around the clock face every 60 seconds, or one minute.
To read seconds on an analog clock, start by locating the second hand. It's usually easy to spot as it's the only hand in constant motion. Each tick mark on the outer edge of the clock face represents one second. As the second hand moves from one tick to the next, one second passes. When it completes a full circle and returns to the 12 o'clock position, exactly one minute has elapsed.
Understanding the relationship between seconds, minutes, and hours is crucial. There are 60 seconds in one minute, and 60 minutes in one hour. This means that in one hour, the second hand will complete 60 full rotations around the clock face. To illustrate, let's consider a simple example: If the second hand is pointing at 15 (3 o'clock position), it means 15 seconds have passed within the current minute.
The movement of the second hand can also help you gauge the passage of time more accurately. For instance, if you need to time something for 30 seconds, wait for the second hand to move from the 12 o'clock position to the 6 o'clock position. This visual representation makes it easier to estimate short time intervals without constantly checking a digital timer.
It's worth noting that some analog clocks feature a "sweeping" second hand that moves in a continuous, smooth motion rather than ticking from second to second. In these cases, you can still read the seconds by observing the hand's position relative to the tick marks.
Mastering the art of reading seconds on an analog clock enhances your overall time-telling skills and can be particularly useful in situations that require precise timing. Whether you're timing a presentation, cooking, or participating in sports activities, this skill allows you to keep track of time with greater accuracy. Remember, practice makes perfect, so don't hesitate to spend some time observing and reading the second hand on various analog clocks to improve your proficiency.
Conclusion
Congratulations on mastering the essentials of reading time on both digital and analog clocks! Remember, digital clocks display time in numbers, making it straightforward to read. Analog clocks, with their hands and numbers, require a bit more practice but offer a classic way to tell time. The introduction video was crucial in laying the foundation for these concepts, so don't hesitate to revisit it if needed. Keep practicing your time reading skills regularly to become a pro at glancing at any clock and instantly knowing the time. Whether you're using a smartphone or a traditional wall clock, these skills will serve you well in daily life. Ready for more? Continue exploring our lessons to deepen your understanding of time concepts and sharpen your clock-reading abilities. Time is ticking, so let's keep learning and growing together!
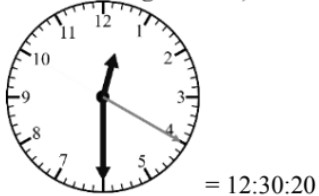
Example:
Reading Analog Clock Time
Read the analog clock and write as digital time. Use the part of the day clue for writing AM or PM.
Night 
Step 1: Understanding the Task
For this question, we need to read the time on the analog clock and write it as a digital time. The analog clock has three hands: the hour hand, the minute hand, and the second hand. Additionally, we are given a clue about the time of day, which is nighttime. This clue will help us determine whether to write AM or PM in our digital time format.
Step 2: Reading the Hour Hand
The hour hand is the thick, shorter hand on the clock. To determine the hour, observe where this hand is pointing. In this example, the hour hand is between 12 and 1. Since it has not yet reached 1, we consider it to be 12. Therefore, the hour is 12.
Step 3: Reading the Minute Hand
The minute hand is the longer hand on the clock. It is pointing exactly at 6. When reading the minute hand, we count by 5s starting from the 12, which represents 0 minutes. Each number on the clock represents a multiple of 5 minutes. Therefore, the 6 represents 30 minutes (6 times 5 equals 30). Thus, the minutes are 30.
Step 4: Reading the Second Hand
The second hand is the thinnest and longest hand on the clock. It is pointing at the 4. Similar to the minute hand, we count by 5s to determine the seconds. Each number on the clock represents a multiple of 5 seconds. Therefore, the 4 represents 20 seconds (4 times 5 equals 20). Thus, the seconds are 20.
Step 5: Determining AM or PM
Given the clue that it is nighttime, we need to decide whether to write AM or PM. Nighttime typically refers to the period after midnight and before noon. Therefore, 12:30:20 at night would be 12:30:20 AM. If it were 12:30:20 PM, it would be in the afternoon, which is not nighttime.
Step 6: Writing the Digital Time
Now that we have determined the hours, minutes, and seconds, and whether it is AM or PM, we can write the digital time. The format for digital time is hours:minutes:seconds AM/PM. In this case, it would be 12:30:20 AM. Remember to use colons to separate the hours, minutes, and seconds.
FAQs
-
What's the difference between AM and PM on a clock?
AM stands for "ante meridiem" (before midday) and covers the time from midnight (12:00 AM) to 11:59 AM. PM stands for "post meridiem" (after midday) and covers the time from noon (12:00 PM) to 11:59 PM. This system helps distinguish between morning and afternoon/evening hours in a 12-hour clock format.
-
How do I read time on a 24-hour clock?
On a 24-hour clock, the day starts at 00:00 (midnight) and ends at 23:59 (11:59 PM). To convert times after 12:00, simply subtract 12 from the hour. For example, 15:00 is 3:00 PM, and 20:30 is 8:30 PM. This format eliminates the need for AM/PM indicators and is commonly used in military time, international settings, and some digital devices.
-
Why does an analog clock have two sets of numbers (1-12 and 13-24)?
Some analog clocks feature an additional set of numbers (13-24) inside the main 1-12 numbering. This design helps readers quickly convert between 12-hour and 24-hour time formats. The inner numbers represent the 24-hour clock equivalent of the outer 12-hour numbers, making it easier to read time in both systems without mental calculation.
-
How can I quickly estimate time without counting every minute on an analog clock?
To estimate time quickly on an analog clock, use these shortcuts: When the minute hand points to 3, it's quarter past the hour; at 6, it's half past; and at 9, it's quarter to the next hour. Each number represents 5 minutes, so 1 is 5 minutes, 2 is 10 minutes, and so on. With practice, you'll be able to glance at the clock and instantly recognize these patterns without counting each minute.
-
What's the purpose of the second hand on an analog clock?
The second hand on an analog clock serves several purposes. It provides a more precise measurement of time, allowing for accurate timing of short durations. It's useful in situations requiring exact synchronization, such as in scientific experiments or coordinating activities. The constant movement of the second hand also visually confirms that the clock is functioning correctly. In some professions, like medicine or sports, tracking seconds can be crucial for timing specific procedures or events.
Prerequisite Topics
Understanding how to read time is a fundamental skill that doesn't typically require specific prerequisites. However, having a solid grasp of basic number recognition and counting can greatly enhance one's ability to learn and master time-telling. While there are no formal prerequisite topics listed for this subject, it's important to recognize that certain foundational skills contribute to a smoother learning experience when tackling the concept of reading time.
One of the most crucial aspects of learning to read time is familiarity with numbers. Being able to recognize and understand numbers from 1 to 12 is essential, as these form the basis of both analog and digital clock faces. Additionally, having a basic understanding of counting by fives can be incredibly helpful, especially when reading minutes on an analog clock.
Another beneficial skill is the ability to differentiate between big and small hands on an analog clock. This concept relates to size comparison, which is often introduced in early mathematics education. Understanding that the hour hand is shorter and the minute hand is longer is a key component of reading time accurately.
Basic addition and subtraction skills can also prove useful when learning to read time, particularly when dealing with concepts like "quarter past" or "half past." These mathematical operations help students grasp the idea of time intervals and how they relate to the movement of clock hands.
While not strictly necessary, a general awareness of the concept of day and night, as well as morning, afternoon, and evening, can provide context for time-telling. This understanding helps children relate the numbers on a clock to real-world events and daily routines.
It's worth noting that learning to read time is often introduced alongside other mathematical concepts in early education. As such, it can be seen as both a standalone skill and a practical application of various mathematical principles. The process of learning to read time can reinforce number sense, pattern recognition, and spatial awareness.
For students who may struggle with these foundational concepts, it can be helpful to revisit basic number recognition and counting exercises before diving into time-telling. Engaging in activities that involve sequencing, such as putting daily events in order, can also support the development of time awareness.
In conclusion, while there are no strict prerequisites for learning how to read time, a solid foundation in basic number skills and awareness of daily time concepts can significantly enhance a student's ability to grasp this important life skill. By ensuring these fundamental concepts are understood, educators and parents can set children up for success in mastering the art of time-telling, which is crucial for developing independence and time management skills in their daily lives.